Friday, June 17, 2011

A Funky Little Tea Party

For my seventeenth birthday I wanted to have a garden/tea party in my gorgeous backyard.

It was lovely.

We bought a whole host of adorable decorations second hand, and also used some items from our well stashed collection.

It looked just the way I wanted it too.


We strung up some line and strung up a missed-matched collection of lanterns and candles.


Our high-tech streosystem, it usually lives in my little brother's and sister's room.


We used my great-great grandmother's plates, and an assortment of cute tea-cups.
We also used and old quilt, from my Nana, as a table cloth.
It was perfect!


My personal favourite.


Me and my lovely friends!

 And of course the table was spread with lots of yummy treats! Everything was gluten-free.
Which was perfect. I hate not being able to eat stuff. And since it was my party, it only made sense that I made it perfect for me.
I made most of the treats myself.
The rest were made by my Daddy.


This is flour-free cake! It's made with ground almonds.


Once it started getting dark we lit all of the candles, and got the bon-fire going too.


Daisies in the candle light.


I can't wait to have more outdoor parties this summer!


Friday, June 10, 2011

Tea

This morning my mother made me tea in the cutest little teapot ever!


The rose and green leaves are brilliant.
It's the perfect morning greeting!

Saddle Shoes


The other day my mom and I were running some errands, and one of our stops was one of my favourite thrift stores. We were looking for some more decorations for my birthday party, but of course I got distracted by other things. 
I found a cute top. It's like extra-large or something, but I really liked the pattern, and thought it would look cute with a belt (I'm wearing it right now, and it totally does). 

Then, I juast had to look at the shoes.
I ALWAYS look at shoes. I don't often find something that I love/fits me perfectly enough to bother spending money on, but this time was an exception!


Aren't they fabulous!

These shoes are not only darling, but also really old and in excellent condition.
The brand Simpsons ended before the 70's.
After that it became Simpsons and Sears, and now I believe it's just Sears.

They were $12.99, BUT they were blue tag and 50% off!
6 bucks for a pair of the best shoes I have ever seen?
TOTALLY WORTH IT!

Thursday, June 9, 2011

Felt Owl

We found this super cute owl pattern in a magazine, but they didn't have a to scale templates to cut out, so I kind of made up my own pattern and just went with it.
Here's how I made it.
I'm not sure how well you'll be able to follow my instructions, but here they are anyway.

What you'll need:
Felted wool sweaters(everyone needs a good collection of these)
Paper to make your patterns out of
Good cutting scissors
Pins and needles
Matching thread
Embroidery floss
Buttons(for the eyes)
Stuffing(wool or what ever else you have on hand)
Sweet tunes to listing to while you work
   and a sewing machine might be handy too.


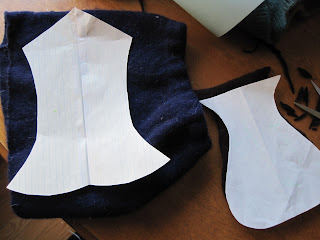
First you need to decide how big you want your owl to be, any size will work I think. The template on the right of the picture(above) is the body, you need to cut 2 of these, one for the back and one foe the front.
The other template is the face/wings. It needs to be slightly bigger than the body.
Wrap it around your paper pattern to test the size before you cut into the sweater!
The top triangle of the wing pattern is the beak/face, that part will go over the straight edge of the body piece.
Here's another view of my pattern, the blue piece of paper is the pattern for the base of your owl. You want it to be the same size as the bottom of the body piece(the side parallel with the straight edge.
    Cut out the base and the body pattern.
Pin the body pieces right sides together and sew around the entire thing, starting at one edge of the bottom and leaving enough room for your base to fit on later.
Stuff the body, make sure the ears are nice and firm!
Sew the base to the bottom of the body.
I kind of muddled through this. The instructions said to use the machine and keep the seems inside... but that wasn't working for me.
So I just ended up sewing it all together by hand, making sure to double my thread and go around twice.
Before sewing it closed completely add a bit more stuffing, if needed.
You don't want a limp owl!
Cut out the wing/back.
Sew the wing/back piece on by hand onto the body of the owl. Make sure it's nice and secure, especially if your creation is going to end up being loved  by a little person.
This is what it should look like once the back piece is all sewn on. Make sure you leave the tips of the wings free so your friend can fly!
Cut felt circles for the eyes. I found that a medicine bottle cap was the perfect template for mine, but you can fiddle with the size until it looks right.
I attached the buttons onto the felt circles before sewing the whole thing onto the face, but it's up to you and how you feel works best.
You can just stitch the eyes on if you want, but I find that the blanket stick gives it a more finished look.
  I wasn't going to add the tummy patch, but I decided(with prompting from my mom) that it would look good.
Just blanket stitch that to the tummy, and your done!


Here's the finished product!
T
he owl was a hit! I made it for a little friend's bithday. He loved his new friend, and the other kids want to play with it too.

The owl's name is now 'Hunter' a pretty great name if I do say so my self!

Wednesday, June 8, 2011

Green Hearts

 A month or so ago, I was out with my mom, and I picked out these super adorable heart shaped earrings.
Apparently I wasn't aloud to have them right away.
At the point my birthday was coming up, so my mom thought she would save them and give them to me then.
Even though I had picked them out myself and everything...

Well, we both totally forgot they even existed.
But she found then, and I got them 4 days after my birthday.


Regardless, I love them!


Monday, June 6, 2011

My Thrift Blog

I LOVE blogging.
I also love being unique, thrifty, and creative.

I'm excited to start sharing my style and things that I find interesting, on this blog.

I'll be posting various treasures that I find, as well as DIY tutorials every once and awhile.

This should be fun!